Deployment Procedure
Deployment Order
The order of the deployment process is of vital importance as many components have dependencies on other components.
The deployment should be in the following sequence:
- Confirm Service Account creation
- Confirm Machine Configuration Requirements
- Execute the Database Deployment
- Execute the Application Server Deployment
- Execute the Web Server Deployment
- Execute the Post Deployment Configuration
- Start the application using the correct Start up Sequence
- Verify the successful deployment of the application
Database Deployment
This section assumes the Database Server meets the required prerequisites.
Create and Fill Database
Open the Sql\Create_LinXmart_Database_And_Schema.sql file provided and modify the DefaultDataPath and DefaultLogPath variables (at the top of the file) to specify the location of the database files specific to your installation of SQL Server. You can leave the other variables as they are.
Run a Command Prompt (cmd.exe) as administrator from the SQL Server machine (or a machine with SQL Server tools installed) and change the directory to the location of Create_LinXmart_Database_And_Schema.sql. Run the following command to create the LinXmart database:
sqlcmd -S <server> -i Create_LinXmart_Database_And_Schema.sql
Run the usp_FlushAllTables stored procedure. This will set up the database with reference data and test data required.
If you want to set the system up with tutorial data, also run the usp_LoadTutorialData stored procedure.
If the main database has already been created (and is empty), you may simply run the Sql\Create_LinXmart_Schema.sql script directly in the database.
Configure User Access
Open Sql Server Management Studio (SSMS) and from the Object Explorer, at the second-top-level, expand Security and Logins. Right click on Logins and select New Login.
Under Login name, enter LinXmart_Worker – this will give the application server access to the database. Go to the User Mappings page, click on the checkbox next to LinXmart at the top (database mapping) and click on the checkbox next to db_owner at the bottom (database role).
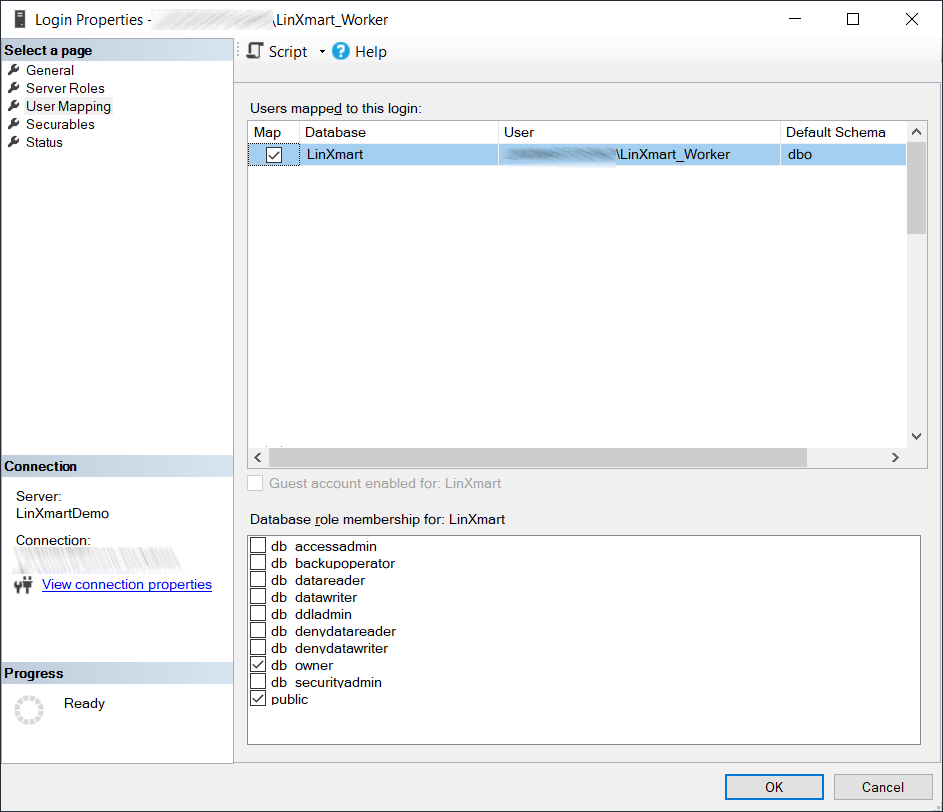

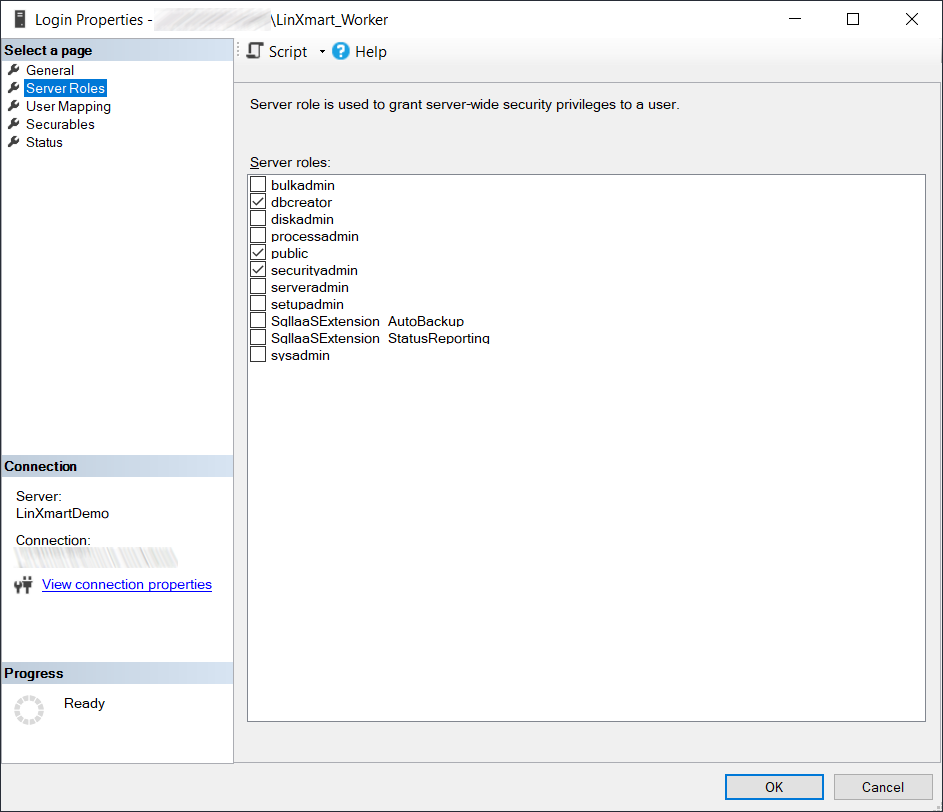
Now go to the Server Roles page and check the boxes next to dbcreator and securityadmin.
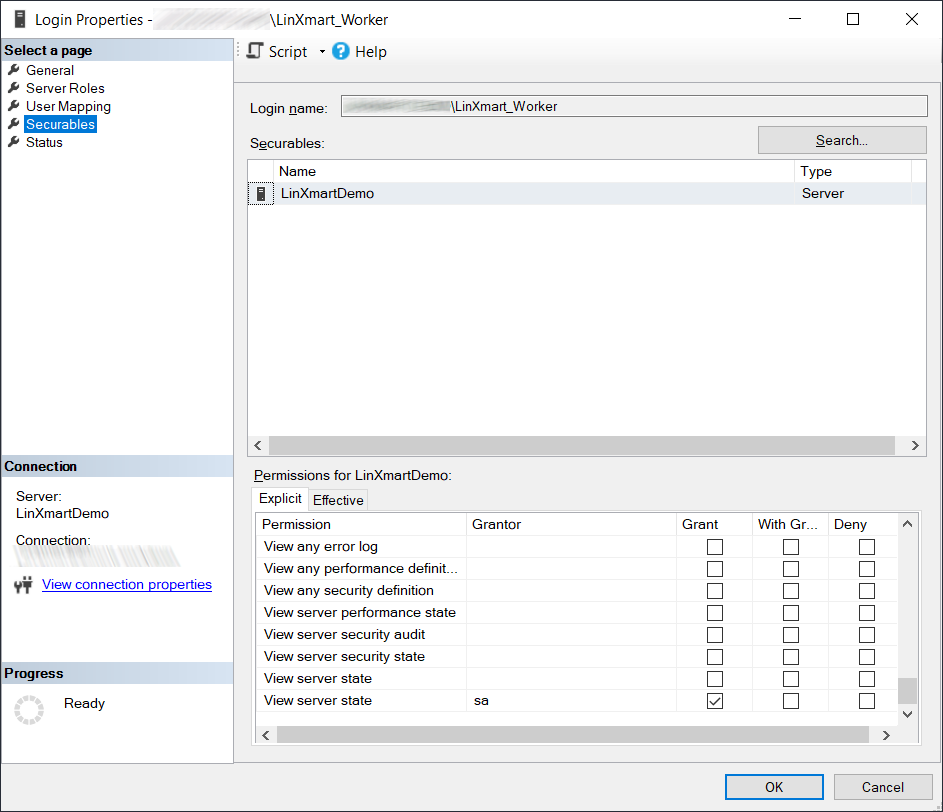
On the Securables page, ensure the View server state permission has been granted.
Click on OK to save the user.
Repeat this process again for the LinXmart_Web user.
Maintenance Backup Plan
It is recommended that a backup plan be set up for the LinXmart database.
The LinXmart database has a Full Recovery Model and the maintenance plan should include transaction log backup and cleanup.
Databases that are created for each linkage project will be prefixed with LinXmart_ (by default) and have a Simple Recovery Model.
For more information, please see the Microsoft Learning article Backup and Restore of SQL Server databases.
Application Server Deployment
This section describes the process to follow to manually install the LinXmart application services.
This section assumes the Application Server meets the required prerequisites.
Copy the installation folder to a local folder on the server.
Update the service installer template script
Before the installer is run, please verify the properties in the run-service-setup.ps1 file correspond to the values required by your environment.
| Property | Description |
|---|---|
sourceInstallZip | The source zip file containing the binaries to deploy the application worker service. This should reference the specific version of the service installer provided in the same folder. |
destinationPath | The destination folder for the worker service. The service will be run from this folder. |
logFilePath | The full file name and path to write the application log file. |
linxmartDataFolder | The top-level data folder for storing of data on the File Server. For example, the EnvelopeStore folder will sit below this folder. It may be a UNC path or shared drive. For the Basic VM deployment, set this to the SMB file share created during the File Server Configuration. |
serviceUsername | The name of the Active Directory account that will be used to run the service. This service account is described as the LinXmart_Worker service account in the Service Accounts table. |
databaseConnectionString | The data source used to connect to the main LinXmart database. This should be updated with the correct SQL Server host name - the remaining parameters should not require changing. |
Install the service
A PowerShell script is used to copy the appropriate LinXmart system files and register a Windows Service.
- Open a PowerShell prompt as administrator.
- Run
run-service-setup.ps1- enter the service accountLinXmart_Workerand password when prompted.
The service will be started by the setup script.
Post installation configuration
- Add the
LinXmart_Workerservice account to the local Performance Monitor Users group on the server in which it is running.
Web Server Deployment
This section describes the process to follow to manually install the LinXmart web and API services.
This section assumes the Web Server meets the required prerequisites.
Copy the installation folder to a local folder on the server.
Update the web installer template script
Before the installer is run, please verify the properties in the run-web-setup.ps1 script file correspond to the values required by your environment.
| Property | Description |
|---|---|
sourceInstallZip | The source zip file containing the binaries to deploy the application worker service. This should reference the specific version of the web app installer provided in the same folder. |
destinationPath | The destination folder for the worker service. The service will be run from this folder. |
logFilePath | The full file path to write the web application log file. |
linxmartDataFolder | The top-level data folder for storing of data on the File Server. For example, the FileStore folder will sit below this folder, and it may be a UNC path or shared drive. |
appPoolUsername | The name of the Active Directory account that will be used to run the web site (Application Pool) in IIS. This service account is described as the LinXmart_Web service account in the Service Accounts table. |
databaseConnectionString | The data source used to connect to the main LinXmart database. This should be updated with the correct SQL Server host name - the remaining parameters should not require changing. |
Install the web site
A PowerShell script is used to copy the appropriate LinXmart files and register the web site.
- Open a PowerShell prompt as administrator
- Run
run-web-setup.ps1- enter the service accountLinXmart_Weband password when prompted.
SSL Certificate (recommended but optional)
Install the certificate onto the server. This is done from the Server Certificates feature at the root level of IIS.
From the web site, click Bindings… and click Add to add a new HTTPS binding.
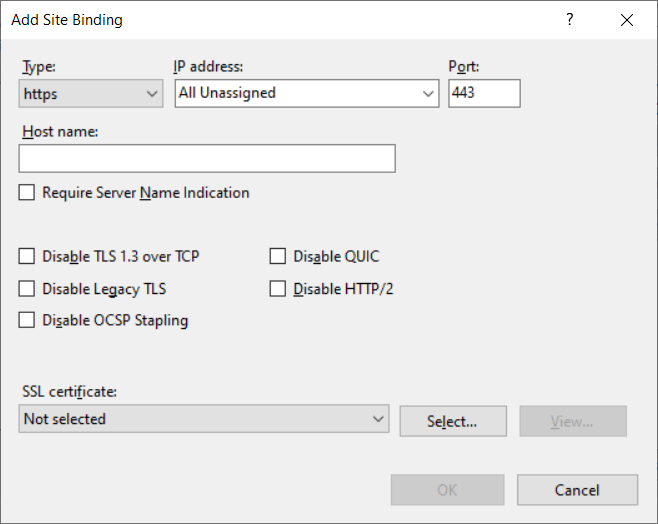
Select the SSL certificate from the drop down and enter the FQDN of the host (this should match the certificate) in the Host name field.
Check the Disable Legacy TLS option.
Check the Require Server Name Indication option if you will host more than one website on this machine.
Click OK.
API Web Site (optional)
The API component of LinXmart that exposes configuration and management endpoints for configuration and orchestration can be installed as a separate web site. This can sit alongside the web application.
To install this, follow the same process from Update the web installer template script using the run-api-setup.ps1 install template script to define the parameters.
Configure Internet Information Services
- Enable Windows Authentication for the LinXmart website (disable all other authentication)
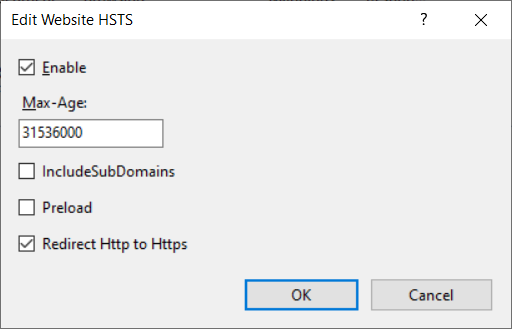
- Enable HSTS (HTTP Strict Transport Security) for the LinXmart website. Set
Max-Ageto 31536000 and choose the optionRedirect Http to Https.
If the Disable Legacy TLS option was not available on the SSL Certificate dialog, TLS 1.0 and TLS 1.1 can be disabled manually:
- Open the Registry Editor and navigate to the following location:
HKLM\SYSTEM\CurrentControlSet\Control\SecurityProviders\SCHANNEL\Protocols\ - Create a key called
TLS 1.0and subkeys calledClientandServer - In each of the subkeys, create a 32bit DWORD value called
Enabledand set it to0. - Repeat these steps for TLS 1.1.
- Reboot the server to apply the changes.